
When your oven decides to stop heating up, it feels a little like your best friend bailing on you last minute. You’re standing there with raw cookie dough or half-prepped lasagna, and instead of warm comfort food, you get… nothing but cold disappointment. If your oven has suddenly stopped working, don’t panic. This isn’t necessarily the end of its life cycle. In fact, most oven heating issues can be traced back to a handful of common problems—and many of them are fixable without calling a professional immediately.
In this guide, I’ll walk you through step-by-step how to diagnose why your oven isn’t heating up and what you can do to fix it. Think of it as a troubleshooting journey where we’ll start from the simplest solutions and work our way toward more advanced repairs.
Check If the Oven Is Getting Power
Let’s start with the obvious but often overlooked step: power supply.
Electric ovens can’t heat without proper voltage, and gas ovens can’t ignite if the control board or igniter isn’t getting electricity.
- For electric ovens: Most require 220–240 volts to operate. If your outlet is only delivering 120 volts, the oven’s lights and controls may turn on, but the heating element won’t get enough power to warm up.
- For gas ovens: They still use electricity for things like the igniter, display, and safety features. If there’s no power, the gas won’t ignite.
What to do:
- Check if the oven clock or control panel lights up. If nothing powers on, inspect your breaker box.
- Look for a tripped breaker. Reset it if needed.
- If the breaker keeps tripping, that’s a sign of a deeper wiring issue.
Personal note: I once spent 30 minutes dismantling an oven only to realize the breaker had tripped when my space heater was running. Sometimes the problem is that simple.
Inspect the Heating Elements (Electric Ovens)
If your electric oven turns on but isn’t heating, the most common culprit is a burned-out heating element. These elements are the metal rods that glow orange-red when the oven is working.
There are usually two elements:
- Bake element (bottom) – for general cooking and baking.
- Broil element (top) – for browning, roasting, or broiling.
When one of these fails, the oven temperature drops dramatically.
Signs your element is bad:
- No glow when turned on.
- Visible damage like cracks, blisters, or breaks.
- Uneven cooking (like the bottom stays raw while the top burns).
How to test it:
- Unplug the oven or switch off the breaker.
- Visually inspect the element.
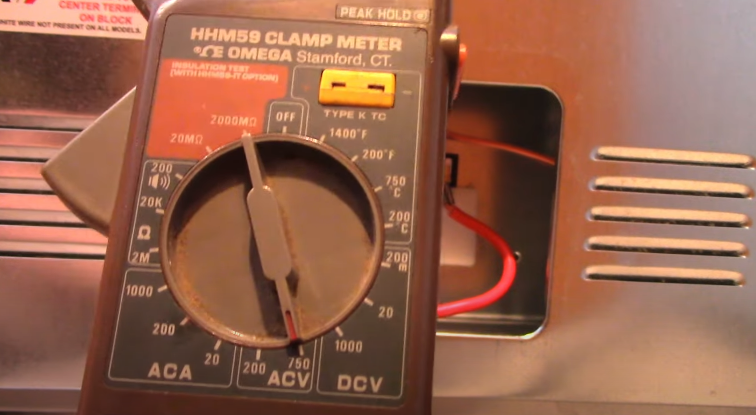
- Use a multimeter set to ohms. A healthy element usually reads 20–100 ohms.
- If it reads infinite resistance (open circuit), it’s burned out.
Fix: Replacing a heating element is usually straightforward. You remove a few screws, detach the wires, and install a new one. Most elements cost between $30 and $80, depending on your model.
Check the Oven Igniter (Gas Ovens)
If you’ve got a gas oven, the igniter is one of the most failure-prone parts. It’s responsible for drawing electrical current and igniting the gas.
How it fails: Over time, igniters weaken. They may glow faintly but not hot enough to open the gas safety valve. This means you’ll hear no “whoosh” of flame and your oven won’t heat.
How to test it:
- Turn on the oven and watch the igniter.
- If it glows for more than 90 seconds without ignition, it’s likely weak.
- Use a multimeter to check for continuity. No continuity = bad igniter.
Fix: Replacing the igniter typically costs $40–$100 for parts. It’s often mounted with just two screws and a wire harness, making it DIY-friendly.
Quick anecdote: The first time I replaced a gas oven igniter, I was nervous about handling gas lines. But the igniter is usually external and safe to swap without touching the gas supply, making it easier than I feared.
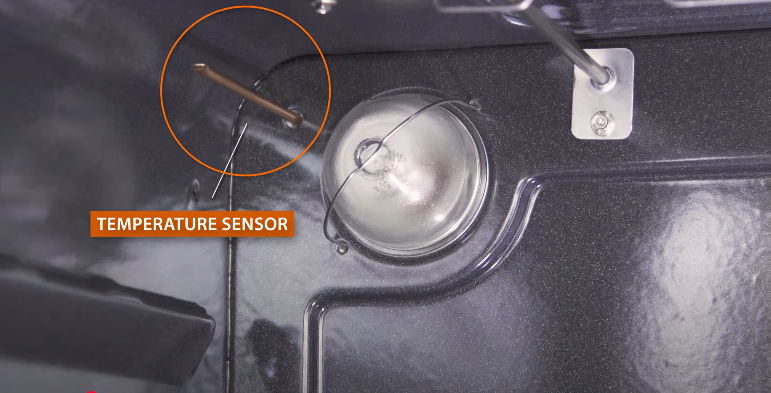
Test the Temperature Sensor
Modern ovens have a temperature sensor (sometimes called an RTD sensor) that monitors heat inside the cavity. If this sensor goes bad, the control board gets incorrect readings and may shut off the heat too soon—or never start it at all.

Symptoms:
- Oven doesn’t heat properly.
- Displays error codes like F3 or F4 on some models.
- Food consistently undercooked or overcooked.
How to test:
- Locate the thin metal rod inside the oven (usually at the back wall).
- Use a multimeter to measure resistance. At room temperature, it should read about 1,000–1,100 ohms.
- If readings are far off, replace it.
Replacement sensors usually cost $20–$50.
Check the Gas Supply (Gas Ovens)
If your igniter looks fine but the oven still won’t heat, you might have a gas supply issue.
Things to check:
- Is the gas valve fully open?
- Is your stove’s cooktop lighting? (If yes, gas supply is fine.)
- If nothing lights, there may be an issue with your gas line or regulator.
At this point, it’s best to call your utility provider or a licensed technician. Gas issues aren’t something you want to DIY unless you’re trained.
Inspect the Oven Control Board
The control board is the “brain” of your oven. It sends voltage to the heating elements or igniter based on your temperature settings. If it fails, your oven might not heat at all, or it may heat inconsistently.
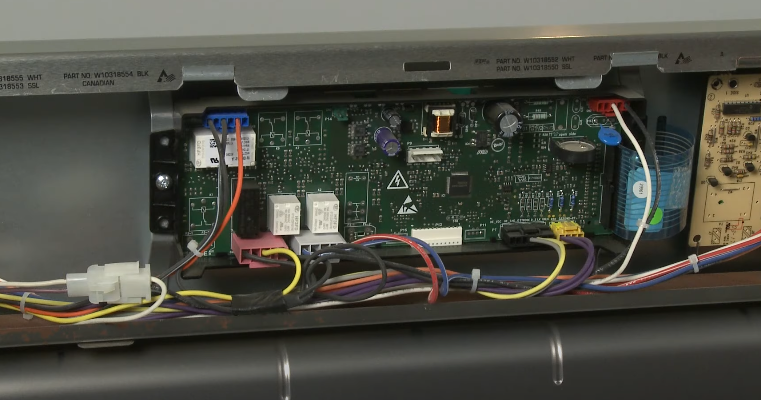
Symptoms of a bad board:
- Oven not heating despite good elements/igniter.
- Error codes on the display.
- Unresponsive controls.
How to check:
- If the heating elements and sensors all test fine, the control board is the likely culprit.
- Visual inspection sometimes shows burnt spots or damaged relays.
Control boards are usually more expensive to replace ($150–$400), but often cheaper than buying a new oven.
Calibrate the Oven
Sometimes the oven does heat, but not to the correct temperature. If you set it to 350°F and it only reaches 300°F, that’s a calibration issue.
Quick test: Place an oven-safe thermometer inside and compare it to the oven’s display after preheating.
Fix:
- Many ovens let you recalibrate by adjusting the control panel (e.g., + or – up to 35°F).
- Check your user manual for instructions.
Common Mistakes People Make When Troubleshooting
- Skipping the basics: Like not checking the breaker or making sure the oven is plugged in.
- Guessing without testing: Replacing parts blindly can waste money. A multimeter is your best friend here.
- Overlooking the broil element: People often assume only the bottom element matters, but both play a role in cooking balance.
- Forgetting about preheat times: If your oven seems slow, remember that most ovens take 10–15 minutes to fully preheat.
When to Call a Professional
There’s a point where DIY stops being practical. Call a technician if:
- You smell gas (urgent).
- The oven trips your breaker repeatedly.
- You’ve tested/replaced obvious parts and it still won’t heat.
- The repair requires dealing with sealed gas components or rewiring the board.
According to HomeAdvisor, the average oven repair costs between $100 and $600, depending on the part and labor. If your oven is older than 15 years, sometimes replacement makes more sense.
Preventing Future Heating Issues
The best fix is prevention. A few simple habits can extend your oven’s life:
- Keep it clean: Grease buildup can damage sensors and block airflow.
- Avoid slamming the door: It can damage the door switch and alignment.
- Check elements yearly: A quick glance can catch cracks before failure.
- Use a surge protector: Power surges can fry control boards.
Final Thoughts
When your oven isn’t heating up, it can feel like a personal betrayal, especially when you’re craving home-baked comfort. But here’s the good news: most oven heating problems are solvable at home with a little patience and the right tools. Whether it’s a faulty heating element, a weak igniter, or a tripped breaker, you can often bring your oven back to life without breaking the bank.
Think of it this way: ovens are like old friends. Sometimes they just need a little attention and care to keep showing up for you. And when you finally hear that satisfying hum of heat returning, it feels like winning a mini-battle in your kitchen.
So grab your multimeter, trust the process, and get your oven baking again.